Saturday, July 31, 2010

VBS Crafts Day 5

We had another day where the youngest group (those entering K-1st grade) did a different craft than the older two groups (those entering 2nd-4th grades and 5th-7th grades).

This was the craft that the youngest group completed — a Western bookmark.

I got the original idea from Making Friends, the same place I got the idea for the Western coasters.

Here's a close-up view of the top and bottom.


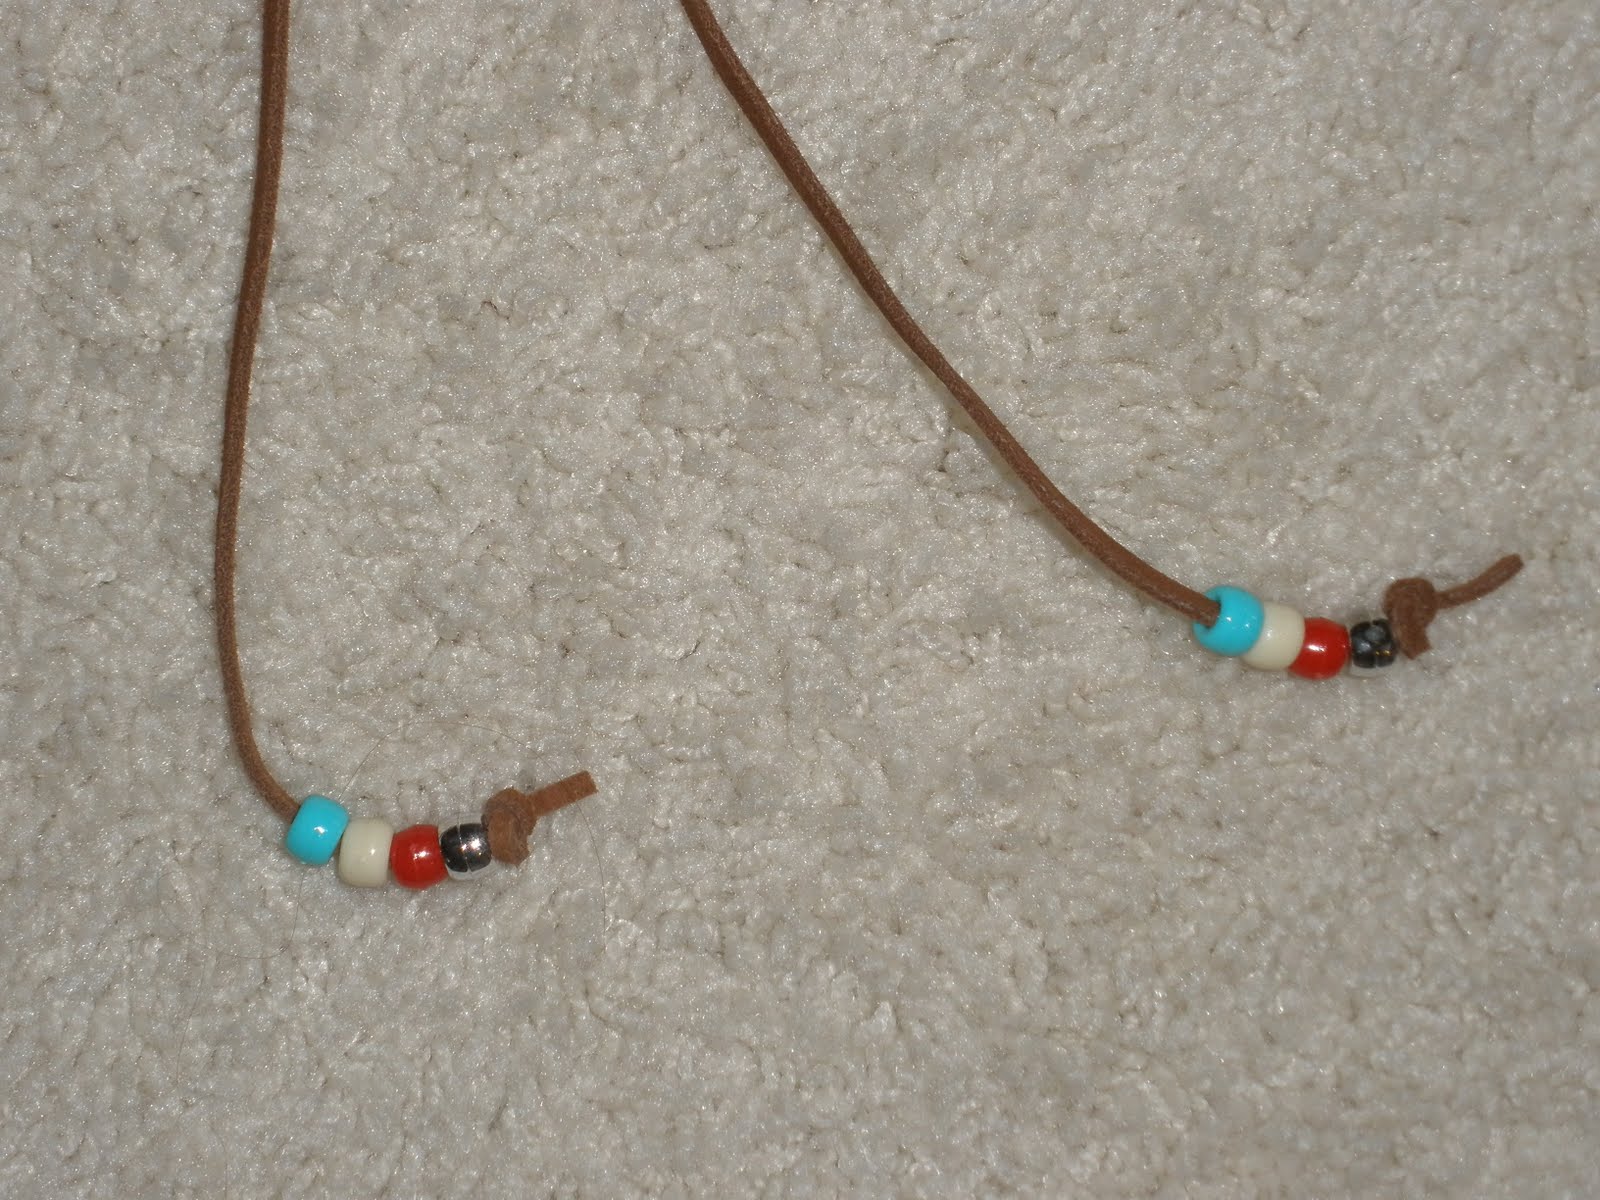
We used a dark brown suede cording purchased at Michael's, each piece cut to 3 feet in length. We pre-tied the knot at the mid-point of the cording and placed it, four beads in each color, plus the heart-shaped concho, in a baggie for each child.

When they were done with their bookmark they were able to put it back in the baggie (name marked on it with a Sharpie) for their leader to keep until the end of the day. Then there were no swinging bookmarks to hit other kids in the head, which still almost happened, and no one got theirs mixed up with anyone else.

Placing a standard DVD box over the bookmark gives you a realistic idea of the length.

The two oldest groups made what is called a God's eye (specific directions can be found here).

I used my hot glue gun and pre-glued about 150 sets of sticks together. I also cut lengths of yarn from variegated skeins in 20 feet lengths. I was able to get by with 15 feet, but we allowed them extra in case they did it more loosely, overlapped their yarn, etc. There were also some skeins with very thin decorative yarn. Since I knew it would take more to get around the lengths of the sticks, I cut it in 30 feet lengths.

I loosely wrapped them into bundles (I just wrapped them around two of my fingers) and then we placed them all out on the tables in the front of the room. We had the kids come up and select the yarn they wanted to use. We gave the older kids the option of making two, one to give to a friend as a witnessing opportunity to share about all the things they learned in VBS.

I was shocked. I honestly thought that this craft would be one of the least enjoyable, especially with the oldest group. They adored it. The ones that got done quickly came back and asked if they could make more than two, and since their snack wasn't ready on time some of them were able to make four, five, and even six. I didn't have a single set of popsicle sticks left!

I shared the link for the specific directions. I didn't number the sticks. I tried it that way at home but it was very confusing. We found that if you turn the sticks as you are lacing the yarn around them it follows a simple pattern and the kids were able to do it more easily. Some of them we found worked it better if we told them "cross over two, under one, over two, under one". Some of the boys were actually saying it under their breath as they were doing it!

I didn't find a way to get fired, so I'm doing crafts again next year.

Friday, July 30, 2010

Winners!

I'll come back and get the links up with your names and some photos posted tomorrow. Well, actually at a reasonable time later today. It's just after 1 a.m. though and I want to get this done right now! Hopefully some of you will see it and can email me in the meantime.

These are the winners from the giveaway where I introduced my new shop, The Daisy Shop. I would love for you to go visit and look forward to the opportunity to do business with you in the future.

In no particular order:

  1. Melissa won the reversible tote bag
  2. Bobbi won ponytail holders (not pictured or even listed in the shop yet)
  3. Jena won a zippered pouch
  4. danyelle won a set of 4 fabric notecards
  5. Betsy won a set of magnets
  6. Lora won a zippered pouch
  7. Kathy won a reusable covered notebook
  8. "D" won a zippered pencil pouch

If you left a comment on the giveaway post and you see your name here, please contact me at kayrenc@gmail.com and I'll get back with you after VBS tomorrow. Otherwise I'll start looking for your email address or blog to leave a comment so I can get your address.


Wednesday, July 28, 2010

VBS Crafts Days 3 & 4

Today was "shirt" day for VBS crafts. I explained at the end of yesterday's post how the two oldest groups (entering 2nd-4th grades and 5th-7th grades) would be doing their shirts and how I prepped them ahead of time.

The youngest group did something a little different with their shirts. After they selected their shirt color and size (either youth M or L), we cut the hem off the bottom, plus a little extra if they were entirely too long, and then cut slits a couple of inches long for fringe.

We did this for the kids because we couldn't get people to let us borrow their sewing scissors, we were afraid of letting kids use scissors that were that sharp anyway, the regular kid scissors were not sharp enough to cut the fabric, and letting kids entering K-1st grade cut shirts might not have had quite the same outcome.

After we fringed the bottom of the shirts, they went to the paint stamping station. We had Western stamps that had been purchased from Oriental Trading. We used the Apple Barrel acrylic paint mixed with a fabric medium. We sponged the paint onto the stamp so there wouldn't be globs of paint on the stamps. A manila folder stuck inside the shirt kept the paint from going through to the back while it was being stamped, although you could use plastic bags too. We thought that would be slippery while the child was pressing the stamp down, and we just slid the folder out when we were done with one child and slid it in the next shirt so we just had to use a few. The folder didn't have to stay there while it was drying since we didn't have so much paint that it would seep through.

They each got to choose three stamps. The wagon wheels are the bottom of thread spools.


We used a slip of paper for their name and pinned it on the shirt. We also used a Sharpie and put their names on the tags, but because we always miss a few, the pinned on paper has us covered.

Tomorrow we will be making foam coasters. The oldest two groups will lace on turquoise and silver beads as they lace them.

The youngest group will just lace it and then use a couple of beads on the ends.

The idea for the Western coasters came from Making Friends. They suggested a much larger coaster size, but when I made the first sample it was entirely too big, and the suede cord barely went halfway around. I ended up making the foam circles 6" and the suede cord is 4 1/2'. The brown foam was purchased in bulk from Making Friends and we were able to cut two from each piece. They are sold out of the conchos, but that's where we were able to purchase those also. I got the suede cord at Michael's, as well as the silver beads. The turquoise beads came from Making Friends.

They are just perfect for my Starbuck's mug!

I'm going to get winners announced tomorrow, just as soon as I cut about 120 lengths of yarn each 20 feet long. And glue some popsicle sticks together with hot glue. I can't forget that!

Thanks for being patient.

Tuesday, July 27, 2010

VBS Crafts Days 2 (Wrap-up) & 3

Day 2 will go down as painting wooden snakes with a passel of kids (and leaders since we had enough snakes for them too!). I survived. I had lots of help. The kids all loved the craft.

I was so busy the entire morning that I didn't get a picture of our original set-up before we started preparing the tables. I also didn't get a picture of all the very colorful snakes before they all got picked up at the end of the day. Shame!

We started out with large serving trays from the kitchen (the kind that slide into those rolling carts like you see with bread sometimes). We used eight trays since we had eight paint colors and placed small Styrofoam bowls on the trays. Then we poured paint into the bowls.

We carried the trays around and placed paint in the center of the round tables. We filled enough bowls for two sets of kids to come through in case we had to replace the paint (we have three sets come through). We were able to just switch out a few bowls as they got too mixed up (especially yellow) or pour some extra if they were getting low.

We had four large water bowls on each table for them to clean their brushes. We switched them out before a new group came in. A couple of people would carry a large restaurant bus-type tub and pour the old water into it and wipe down the tables. We would fill the bowls with pitchers of water rather than running them back and forth to the sink. We also cleaned the brushes in a tub of water in between each group.

We gave each of the kids a paper plate. They wrote their name on it and used it for their snake while they were working on it and while it finished drying. Then when they came to pick it up at the end of the day it was also easy to locate. Here is one of only three pictures I took the entire day.

One of the men who is helping set up a large soapy bowl of water with paper towels as a washing station for their hands for when they were done. He was so smart to do that so no one had to be running kids to the bathroom. With our child protection policy, that would have turned into chaos.

Wednesday is always "shirt" day. This year we are making a fringed and tied t-shirt. To keep them modest and not worry about whether or not kids would wear something underneath, I sewed up the sides of the shirts 2" from the edges before cutting them open.

There are no side seams on the shirts that must be cut off.

After I cut up the side of the shirt, I cut little slits all the way up the sides.

Tied one tie in each one of them (front-to-back)

and you have a cute fringe-y, tied Western t-shirt.

There will also be orange, red, golden yellow, blue, and chocolate brown.

I will have to be good and take pictures of the group going into K-1st tomorrow. They are doing their shirts a little different (we are assuming many of them might have difficulty tying if they can at all), but I couldn't take pictures because I don't have a sample.

Monday, July 26, 2010

VBS Crafts Days 1 & 2

We are having the Western-themed VBS at our church. You'd think with the plethora of ideas available that crafts wouldn't be an issue. Add a huge span of ages and thus abilities, plus cost control for up to 180 kids, and it becomes one.

I have three age groups that come through during the morning. They are kids going into K-1st grade, kids going into 2nd-4th grades, and kids going into 5th-7th grades.

Today the youngest group made prayer boxes, courtesy of Oriental Trading company.

The two oldest groups made prayer journals. I spent part of the weekend separating two packages of 500 self-stick foam shapes each into 120 individual bags. That was so we didn't have fussing over horses and cows and boots and hats and, "I didn't get any big shapes," and, "He got seven big shapes," and you get the picture.


We purchased 6x9 foam rectangles in bulk from Discount School Supply. We also purchased some bulk white sulphite paper in 12x9 and then cut it in half to 6x9. A local print shop cut the seven holes for us.

We cut jute twine in 4 foot lengths, and then used masking tape on both ends to make the equivalent of shoelace aglets. It helped to lace the twine.

We put 25 sheets in each journal and started the bottom of every one. We wanted to get the knot tied and make sure it was loose enough so the kids knew they needed to lace it loosely so they could open the journal.

When the kids came in today, they laced the journal, knotted the top, and then we had some enamel charms we gave them, also from Oriental Trading. They were smaller than we originally anticipated, so the kids had to 'roll' their aglets to get them round and tight to go through the jewelry ring on the charms.

They laced it to the top of the journal and then tied another knot.

They put another charm on and left it towards the bottom of the twine, tying a knot to keep it in place.

It serves as a bookmark for the prayer journal.

They decorated the front with the self-stick foam shapes, also from Oriental Trading, and wrote with Sharpie markers if they wanted.

Tomorrow we are painting wooden articulated snakes that were available from Discount School Supply and Oriental Trading by the dozen.

We are using liquid watercolor paint that we purchased from Discount School Supply. I painted my sample like the colors of the rainbow just to show the kids and also to get an idea how long it would take, just as an example for the ambitious kids.

I love this paint. It doesn't take much at all, it dries quickly, and it's really simple to use. I had to be careful because it wanted to spread easily from each piece if they were touching and the brush was especially wet (you can probably tell where a couple of the colors did that). I even watered down the blue and it made it lighter. I'm sure all of the colors would work that way.

I've never painted with a passel of kids. I may not be so enthusiastic this time tomorrow. Or maybe I will because it will all be over.


Saturday, July 24, 2010

Company and Chaos

In the middle of this last week we had company for one full day and two nights. We don't get much company up here in Michigan from our families in Arkansas, so we were excited.

My cousin Jeff and his wife Jennifer take a trip each summer to several ballparks. They are on a quest to visit every baseball venue in the U.S. and the one in Canada, which they will see on this particular trip. Their daughter Meredith goes with them part of the time, depending on what the rest of the trip includes (you might remember her from last year when I asked you to keep her in your prayers).

When their family flew into town on Tuesday, they went straight downtown to have dinner and watch a Tigers' game before coming to our house. On Wednesday we took them to Frankenmuth.

We started out at Zehnder's for a famous chicken dinner. They had a decorative flower chicken out front this year (Chatty is missing since she was back for her second week of horse camp).

Then we went to Bronner's Christmas Wonderland. We also drove them around (they were shocked by the number of dirt roads around us) and showed them our favorite local cider mill.

Although Buddy has never really been around Jeff enough to pick up any of his mannerisms, there are times when Hubby and I will notice his facial expressions and voice inflections and he reminds us of Jeff growing up (he's 10 years younger than us). We've always noticed a resemblance in the two as well.

We had a great, even if it was short, visit. We tried to remember the last time we'd seen them, and we think it was 2004.

As far as the chaos I mentioned, this coming week is VBS. I am the crafts' director. I've directed VBS before, but never crafts. I'm trying to get in my element. This is what my living room floor looked like earlier tonight.


My sewing machine has been seeing some different action the last week or so.


132 to be exact, and not all pictured. You also probably have no clue what I'm doing with these.

I'll show you all the crafts as we progress through the week. I might group them together into a couple of posts rather than spread it out over the whole week.

Monday, July 19, 2010

Blondies

Remember the giveaway that is open until Saturday night and if you haven't checked it out yet, my new online shop, The Daisy Shop.

I love me a good brownie, but I have a new obsession — blondies. I'm addicted, and my cholesterol isn't happy. Well, technically I guess my doctor that wants my cholesterol to go down wouldn't be happy if he knew.

These are delish! Make them at your own risk.

Blondies
from The Simpsons

2/3 cup butter
2 cups brown sugar
2 eggs
2 tsp vanilla
2 cups flour
1 tsp baking powder
1/4 tsp baking soda
1 tsp salt

The first time I made them I used too much butter. It's because I used to be good at math, quick too, but now I have to mull it over a few times and double check myself. Using the sticks, it's 10 1/3 Tablespoons, just in case anyone else wants to save brain cells. It's nice that they have the Tablespoons marked, but the first time I used some crazy amount on the second stick. I don't know what I was thinking.

Melt 2/3 c butter. Add the remaining ingredients and mix together. (I usually mix them all except the flour and add it last.)

Put in a greased 9x13 pan. Sprinkle 1 cup chocolate chips on top. Bake about 30 minutes or until the middle is done.

You have to cool them some before you can cut them. Waiting is the hardest part.


Friday, July 16, 2010

Introducing *The Daisy Shop*

When you click over, I don't have my banner yet. It should be up by next week. But if I wait until everything is perfectly in place it feels like it will never happen.

I've been sewing up a storm, figuring out how to make things, tweaking them, getting all googly eyed late at night. I'm now ready with a small little stock of inventory items to officially open up

The Daisy Shop.

You'll find items handmade by me...reversible tote bags, zippered pouches, pencil cases, covered notebooks (I've been carrying mine for a little bit while I've been making some up for the shop), magnets, fabric notecards...I'll be adding tissue pouches and ponytail holders in the next week or so, and I have a few ideas for other items.

I'm going to be giving away several items in celebration of the opening The Daisy Shop. Here's how to enter (read all the way to the end please):

  1. Go check out my store and tell me your favorite item for one entry in the giveaway.
  2. If you are a follower of my blog either on my sidebar or in your google reader, leave me a separate comment as an entry. This way you'll be first to know when I put new items in the shop, too.
  3. I'd love to get the word out about my shop, and I'd love for you to help me. If you do a blog post telling people about my new shop and linking to it, leave me a separate comment as an entry.
  4. If you purchase something at The Daisy Shop, you get another entry (just leave a separate comment). It's the least I can do to say, "Thanks."

Comments will be open until Saturday, July 24th, at midnight.

Please, please read the following directions carefully. I don't want anyone mad at me.

***The first person to leave three separate comments (checked out my shop/favorite item, follower, and blogged about my new shop...as outlined 1 through 3 above) and a fourth comment saying they have done all these things will get these three items. You don't even have to wait for the giveaway to be over on the 24th. Please do not leave your comment until you have completed your post and can leave the link to it in your comment.***

A reversible tote bag (you just can't see the *bling* when you reverse it) approximately 13" wide x 15" tall, without the straps:


A covered notebook, complete with button closure, coordinating interior fabric, a pocket for up to 3 pens/pencils, and a bonus pocket on the back inside flap for business cards, small receipts, etc.


A box bottom zippered pouch, approximately 4 1/2" x 6". This one is not interfaced so it's a little more relaxed. It has an interior coordinating fabric. The box bottom measures approximately 1".


***If you aren't first, don't worry! I'm giving away more items after comments close on the 24th.***

A zippered pencil/pen pouch (or really for anything!)...measures approximately 3 3/4" x 8 1/2" without the side tab:

A covered notebook:


A reversible tote:


A set of 4 fabric notecards:


I'm even going to give away a couple of zippered pouches! You'll have lots of chances to win.

I appreciate it if you can get the word out about my shop. I hope to be doing business with you soon!

Thursday, July 15, 2010

Tomorrow

I'm making my official announcement tomorrow morning in a blog post. I'll have it scheduled to post at 8 a.m. (EST).

Why am I telling you this? I'm going to have a few giveaways associated with my announcement, and one of them has to do with being first.

So to try and be fair to everyone (which I know is impossible, but I foolishly try), I'm telling everyone when the post is going up.

I'm excited and a little scared all at the same time!

Friday, July 9, 2010

Big News...

I haven't had much time to blog lately. I've been very busy late into the nights.

I'm going to post big news soon. Big for me anyway.

The pictures are a hint. I'll even have a giveaway when I post my big news!


Have a great weekend! I'll be busy...
 
Designed by Blogs by Sneaky Momma