Showing posts with label decorating. Show all posts

Thursday, October 20, 2011

Yarn Wreath

So I might have a little bit of a wreath fetish.

I'm also addicted to Pinterest now. And I've just been messing around with it for like a week or something. That's where I got the idea for this wreath though.

I started with a styrofoam wreath and had Hubby spray it with spray adhesive. Then I took strips of batting and covered it. You could use tacky glue instead.

I followed that with white yarn, and where I started it I used a floral pin to hold it down. I looked for Bernat baby blanket yarn, but I couldn't find it. So I got some kind of fluffy-ish yarn (maybe baby bee, but I already threw the wrapper away). I got the yarn at Hobby Lobby. I have seen the baby blanket yarn online, but I wasn't willing to wait to make the wreath.

After I finished wrapping it I used another floral pin to lock down the yarn and then made a loop around the pin and tied a knot to have something to hang it from. Then I started making my felt flowers.

This is a great tutorial that was linked to from the wreath instructions, and I used the method where I didn't glue the strip together before I snipped it and rolled it up.

I just glued everything on with my hot glue gun.

I had to hang this from my glass back door. I'm having trouble finding enough places to hang wreaths in my house. I have to many ideas!

Thursday, April 28, 2011

The Bunny Chair And Hillbilly Pillow

This morning the girls had a commitment at church and then went to lunch. I took that opportunity to work on my grandma's rocking chair that I've had since Caboose was born (over 11 years ago). It is still in the same condition as when I got it, which has lots of lovely mustard color from the 1970s. The wood is pretty scratched up from being old and from being moved at least four different times since we've had it. Once we even saw it taken off the moving truck out of a wooden crate, sitting upside down on top of our grill. There wasn't any packing material around anything in that entire crate. Needless to say it went down as one of our two worst moves.

I could have painted the wood and then sanded it, or I could have sanded it and evened it out, but I wanted this to be as simple as possible. I'd been motivated by the nester covering a footstool in fur with her glue gun, and the primary reason this chair hadn't been recovered yet was because I was intimidated by the upholstery. It wouldn't be like covering a chair seat and stapling underneath it.

I bought some white short fur half price at JoAnn's a few weeks ago. The base is a little thin, but I had some light-colored muslin I hot-glued on the chair first. I could have gotten away with not using it, but it looked better with it.

The girls walked in after lunch and I had the chair about 75 percent finished. The first thing Chatty said was, "It's a bunny chair."

I did vacuum it, but I'm curious to see if we can sit in it without having to use a lint roller. I vacuumed myself too. It was not a pretty sight. I thought I was part bunny by the time it was all over! Of course it didn't help that I was wearing black knit pants.

At Christmastime I purchased a set of two matching fabric napkins at Target. I used them to make a pillow. Since the napkins had finished edges there were a lot of options, but I have it finished off with a zipper.

The first thing Caboose said when he saw the pillow back then was, "It's a hillbilly pillow!" He still doesn't really like this pillow. I don't know why. I think I'm going to move it to my bed.

Tuesday, January 25, 2011

Tour The Rooms — Buddy's Room

We (as in Hubby and I) bred a sports lover. It's evident in his room.

When we refer to his room with other people, we say, "It's the one with the big men on the wall at the top of the stairs."

Buddy loves red. If we'd let him have his walls red, he would have. But with the red shelves it would be just too much.

So we picked a green that reminds us of the Green Monster at Fenway Park. It's by Behr and is called Vineyard.

This is the view when you walk in the room. The denim curtain panels I recycled from old bed skirts here.

You can see all the card collecting he does. He's been at it now for just over seven years. It's even how he learned to alphabetize.

Standing in front of the window looking back toward the door wall, this is the view:

I guess we should say, "Big men on the wall and tiny men on the shelves," when we are referring to his room.

And here is a better look at the bed wall:

I just got the duvet cover at Ikea last week. Buddy had been using his duvet with no cover on it for a year. We just hadn't been able to find anything we liked. Ikea finally had a few new patterns, and this one seemed to work.

The funny thing is that Hubby brought Buddy a new pair of Razorback pajama pants home from his trip last week. They are plaid and almost match the pattern and color perfectly. We told him when he wears them he'll be camouflaged and we won't be able to find him!

I guess it would work during a game of hide and seek!

The red wall shelves and shelving units are from Ikea.

Saturday, December 4, 2010

Window Mistreatments That Aren't For Your Window

I originally showed you my doorway covering in this post when it looked like this.

We have nine foot ceilings, so I purchased 54" wide fabric at JoAnn's in the clearance area. It's tone-on-tone in a neutral beige-ish color. I picked it before I picked our wall color, and the walls are not painted in these first pictures.

I bought 6 yards and cut the piece in half so I had two 3 yard pieces. I folded the top under twice and used the clip drapery hooks. I left the edges unfinished and tried to live with it for a while.

I couldn't do it. If I'd been the Nester I would have hot-glued my fringe on the edge, but it was easier and faster for me to just sew it down the sides. I had the fringe in my stash already. I'd purchased it on clearance over the summer and thought I might use it to make tassels or something. I purchased everything JoAnn's had since it was regular $15 a yard marked down to $3. I had enough to do both sides and still had some left.


Now we can close school off after we're done for the day, and we can also shut it out from the rest of the world when we have company.

Window treatments don't have to be for windows!

Monday, October 18, 2010

Upcycled

Chatty got our old (as in previous) white bed skirt when we got our king-sized bed a couple of years ago. She's the only kid with a queen bed and the bed skirt has a scalloped trim, so it fits for her.

Then we have a single panel floor length drapery that the girls had when they shared a room back in Illinois. They had a walk-in closet, and we removed their closet door because they were able to have their dolls and toys in there and play with them there. It was a pretty big closet. We hung the panel on a simple spring-rod at the top of the door frame so you couldn't see into the closet and then it added a little cuteness to the room.

We haven't been able to use that drapery panel again, but it's moved with us. I almost got rid of it as well as the bed skirt. Then I saw an idea in a catalog or magazine using a white bedskirt with different colors of ribbon attached all the way around it. I decided I could use the sheer colored strips from the panel that had flowers attached to them, cut them into the lengths I needed, and then attach them to the bed skirt.

My favorite way to attach stuff when I can is hot glue. I used low-melt so I could touch it. I think hot glue guns are the girl version of guys and their duct tape.

When the cord reached, I put the glue directly on the bed skirt.

When the cord didn't reach I just put the glue on the strip and then stuck it on.

I pressed each one down.

Lots of cuteness.


I actually had the bed skirt out in my garage sale last year and it didn't sell. I kept it out when I took things to the Salvation Army a few months ago knowing I planned to do this. I'm so glad it didn't sell. And I usually don't say that after a garage sale.

Monday, August 30, 2010

Hiding Places

The school room, which has now become a school room/sewing room, is more often than not an eyesore.

When you walk in the front door, it is immediately to the left. No door. Just a lovely opening to greet you.

No matter how picked up the rest of the house was, this room was the first room anybody saw when they walked in my house. It's never completely picked up right now. More often than not it's a bit of a mess.

People don't come to visit when it's dark outside and you can't see the mess. So I needed to come up with a way to hide it.

Hubby was not in any way, shape, or form convinced that this was a good idea. He only likes it because I love it.

I found some tone-on-tone neutral fabric on clearance at JoAnn's. It's the 54" wide stuff for decorating. I can't come up with what it's called right now. I think it has a special name.

We have 9' ceilings on the first floor, so I had them cut 6 yards of fabric. When I got home I cut it into two panels.

I hemmed the bottom of both, folded under the top a couple of times to make it the length I wanted, and used black clip hooks on a regular drapery rod.

I tucked the sides in before I folded the top under twice. That's because I decided not to finish off the edges.

At least for now. I might have to go back and do a straight stitch down the sides to keep the pinned down. I'm going to live with it a couple of weeks first and see if I can deal with it.

I'm linking up with Metamorphosis Monday at Naps on the Porch.


Wednesday, May 12, 2010

Take Command

I love the Command Picture Hanging Strips. I love them so much that I've already blabbed about how I've used them here, here, and here.

There are two strips that attach to each other with a plastic velcro-like material. One of them sticks to your picture (or whatever) and the other one sticks to the wall (or whatever). I tend to have more whatevers than walls.

Here's my latest whatever:

I got these cute little pictures at JoAnn's super inexpensive around Valentine's Day. A key word there is little. They are too small to hang just anywhere, and hanging them from that wire would be a little dorky. Believe me, I held them up around different places in an imaginary way and tried.

Some little light bulb (or camera flash) went off in my brain one day when I was walking by our game cabinet. I thought they might be cute hanging on the side instead of having to look at it all plain every time we came down the stairs.

Of course I immediately thought of my handy dandy Command strips. I used the smallest ones for these. I usually adhere the whole strip put together on the back of the pictures (or whatever) first and then peel the backing off of the part that goes on the wall (or whatever) and just press it on. Then I don't have to try to match stuff up. It's already on there.

Here is a side view:

We played the "What's Different" game with the top of the cabinet once. I don't know if I mentioned that before, but I don't think I did. It happened on a small group night when I was dusting and I decided to change it. The only thing that was originally there is the house. You'd think the tree might be obvious, but I even had to tell Hubby where to look. Oh, well.

Thursday, April 8, 2010

Finally Finished!

The project that wouldn't end has ended.

This is the best before picture I could find.

Unfortunately it doesn't show the knobs from the doors. But I did take pictures of them before I tossed them.

When I unscrewed them before I painted the doors, they came apart.

Being screwed on is what kept them together.

I wanted new door hardware anyway. I couldn't find anything with the small spread these had, so I patched up the holes and drilled new ones.

Paint and power tools all in one project. If it hadn't taken the better part of the week it might have been exciting.

Tuesday, April 6, 2010

The Project That Won't End

It takes so much longer to paint furniture than I thought it would.

In this picture, the left one has a primer, and the top of the right one has the primer and two additional coats of a glossy paint that matches our trim color.

We thought having multiple shades of whites would be about as bad as all the woods were in the room with the new wall color. We knew the paint color since they left some in the basement, and we were set.

I've had these shelves since I was a senior in high school. They moved with us Hubby's entire military career. I have to have the left one for my doll collection since the top has glass shelving and doors.

There is one on the other side of the room (remember the hole picture). I also have the doors for the bottom of these, the edges of the glass doors for the one with the dolls, and two shelves that were removable. Long, long project (three days at least, and I consider any project I can't finish before bed long), but it's going to be worth it when they are finished.

Thursday, April 1, 2010

How We Pick a Paint Color

The Nester did a post on how to pick a paint color.

It was after we picked a paint color for our living room.

She had links with other suggestions and recommendations on how to pick a paint color. All of them were about neutral paint colors.

We did not pick a neutral paint color.

I've mentioned many times that my favorite color is blue. I realize that I cannot paint every room in my house blue.

I've also mentioned that my favorite color combination is fuchsia and orange, and I also realize that those paint colors would not look good in my living room. Soft versions of those colors might go in Chatty's room, but that's the extent of those colors for any room in our home.

We also have a lot of Americana in our home and that color scheme. I love the blue and cranberry colors. I love stars and Colonial art. But dark blue on my living room wall didn't seem an option, and cranberry red also didn't seem an option. No red seemed an option.

And before you say, "I saw your post the other day when you were starting. You painted it red!" Nope, not red. That's the disadvantage of lighting, cameras, computers, and monitors.

Our way to pick a paint color was not using a pillow or other accent in the room as a starting point. We also knew we couldn't use a neutral in the brown family since we had different wood colors, a brown sofa, and a tan/camel-ish extra large chair (that The Nester would also despise).

Our expert way to pick a paint color — take the pair of shorts the color I loved that I thought might look good, hold it up all over the room, take it to Home Depot and have it color matched in the Behr Paint Plus Primer, and paint the walls.


It's a dark burnt orange color.

Here are the shorts in front of my red and pink shirts.

We've also moved our furniture around, which I was thinking about doing and was further encouraged after reading another post by The Nester. She's making all kinds of work for Hubby. He's going to not like her after he reads this post.

But I can't share pictures with you yet. I will as soon as someone in the house paints three of the wood shelves that are in the living room that I've had since I was a senior in high school. They're going to be painted the same eggshell-ish color as the trim in the room.

We still have the kitchen to finish too. I never have been able to stand caulking. I found out that dealing with grout is thousands times worse. Now we need to caulk around the tile and paint the kitchen. I'll let that color be a surprise. Hubby said maybe he'll paint the kitchen in a month and a half when the nightmare from the living room is gone. Edges with dark paint weren't fun.

Tuesday, February 16, 2010

Fabric Family Rules

I showed you a little teaser of my project when I was getting started the other day.Here's what you'll need if you do it like I did:

24x36 canvas
paint to finish out the sides and edges
fabric (at least fat quarter width works best, but you could use scraps and piece them)
iron-on transfer labels
mod podge (I used the gloss)
sponge brush
iron
cutting mat and rotary cutter make it easier to cut the strips, but if you have decorative scissors that will cut your fabric (mine were too dull) you could do that

I downloaded some cute fonts from here. There are even directions on how to get them to show up in your dropdown menu, which I never knew how to do.

I typed out the rules I wanted to use and set up my page for landscape. I tried out different fonts on each one until I found the one I wanted in the size I wanted. I had the margins at 1/2" on each side and to fit on the canvas they can't run much past two full lines. I printed them out on plain paper and cut them out to see if they would fit and if I liked the fonts before I printed them on the transfer paper.

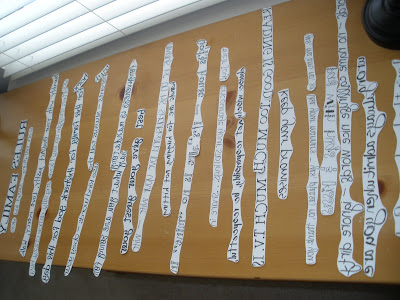
When you print them on the transfer paper you have to print them as a mirror image. Then I cut all of those out prior to ironing them on the fabrics I chose.


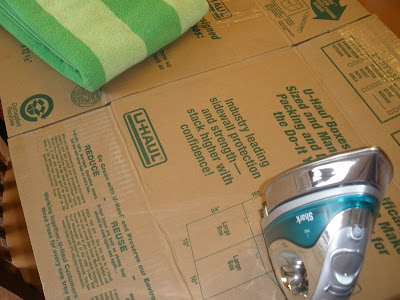
I placed an old moving box on the table with a beach towel on it. The nice thing was that the towel had lines on it so it made it easy to line things up as I was ironing.


I used 11 different fabrics and repeated all of them except for a couple. Once I got all the words ironed on I started cutting them out.

I lined everything up before I started mod-podging it on.

When I was done I decided that I didn't like the way the edges looked all different lengths, so I cut some of the dot fabric for the sides. It covers almost all of the ends.

Then you just mod podge it until it's stiff like my hair in the '80s and '90s.

It hangs in my newly painted 'mud room'.


My family rules were taken from other family rules I'd seen, some were original, and some a combination of the two.


The transfer does show up a little, but not as much as in the pictures with the flash.

I'm ready to make another one for the second floor outside the kids' bathroom and bedrooms. I think it will need to be a slightly smaller canvas because of the space, so if it is I'll have to alter everything. But I'm still going to do it sometime soon.

I got my ideas for the family rules here, here, and here.

This post is linked to Works-For-Me-Wednesday at We Are THAT Family and Show and Tell Friday at My Romantic Home.


FAMILY RULES

Act justly, Love mercy, Walk humbly with your God
thank God for this day, for this family, for this home
use kind words - obey your parents - always tell the truth
sing silly, dance crazy, hug often, snuggle up, say I love you
always admit when you are wrong
say what you are sorry for - forgiveness is mandatory
give your guest your best
husband love your wife - wife always be on his side
hands are for hugging, not hitting
there is no “mine” in this house - it’s all God’s
encourage your siblings. . .share in their joy!
act responsibly, be respectful, choose wisely
too much t.v. is bad. . .too much reading is good
keep your promises
use your manners - yes, please; no, thank you; yes, ma’am; no, sir
pay with hugs & kisses
use nice words - ignore dirty words - no name calling
love the Lord your God
 
Designed by Blogs by Sneaky Momma